Retail teams are juggling too many tools, tasks, and touchpoints. Marketing automation workflows bring it all together.
Instead of manually switching between platforms, guessing the next step, or sending batch-and-blast emails, smart retailers use workflow automation tools to manage their marketing processes and their time.
With the right setup, your marketing team can:
- Automate email marketing workflows, SMS marketing, and social media posting
- Trigger personalized messages based on real-time customer behavior
- Nurture potential customers across the customer lifecycle
- Save hours by eliminating repetitive tasks and reducing manual tasks
The best part? These automated workflows improve campaign performance, increase customer retention, and free up space for more strategic work.
This guide will help you design a custom workflow that supports your retail goals.
Want to boost lead generation? Improve your re-engagement campaigns? Or bring your marketing efforts together across multiple channels?
You’ll find practical steps and tools for all of it, without the fluff.
Short on time? Here are the main takeaways:
TL;DR:
- A good marketing automation workflow helps your marketing team do more with less.
- Use workflow automation tools to cut down on manual tasks, reduce errors, and save time.
- Trigger automated messages based on customer behavior, purchase history, and more.
- Combine email marketing, SMS marketing, and social media workflows to reach your target customers.
- Personalize your marketing campaigns using dynamic content and real-time customer data.
- Always track your campaign performance and keep optimizing.
So, why does this all matter?
Before you start building, let’s break down what marketing automation actually is and why it’s a must for modern retail teams.
Why do you need marketing automation?
A marketing automation workflow is a set of pre-defined actions triggered by customer data or behavior.
These automated workflows guide your target customers through every step of the customer journey, from their first visit to becoming a loyal, repeat buyer.
Done right, marketing workflows help your team:
- Build stronger relationships with personalized messages
- Drive conversions with timely marketing campaigns
- Save hours by automating repetitive tasks and reducing manual work
- Improve the overall customer experience with relevant, real-time communication
Effective marketing automation also boosts customer retention, extends customer lifetime value, and fuels revenue growth.
Just ask retailers like By Malene Birger, who used automation to grow full-price shoppers by 109%. Or POWER, where 90% of all CRM-related sales came from automated workflows built with Voyado.
Ready to build a workflow that actually works?
Here’s how to create a high-performing retail marketing workflow step by step…
6 Steps to Set Up a Marketing Automation Workflow
Building an effective retail marketing workflow doesn’t have to be overwhelming.
Start small, work with the data you have, and let your workflow automation tools do the heavy lifting.
But first, here’s a smart tip from Polarn O. Pyret, a children’s brand known for automation excellence:
“Instead of building many small automations that connect, try to build the entire customer journey into one comprehensive flow. This way, you’ll better understand how each step fits together, making it easier to track results.”
You can still create smaller custom workflows for specific touchpoints. Just make sure your messages are connected, not chaotic.
1. Define your goal
Every marketing automation workflow needs a purpose.
Are you trying to:
- Welcome new subscribers?
- Encourage second-time purchases?
- Win back lapsed customers?
Choose one goal. Keep it focused. This helps your marketing team align on what success looks like and build around that outcome.
Pro tip: Start with a high-impact area, like a welcome flow or cart abandonment, and expand once it’s running smoothly.
2. Set clear success metrics
You can’t improve what you don’t measure.
Define how you’ll track progress using clear key performance indicators (KPIs), such as:
- Open and click-through rates
- Conversion rates
- Revenue per send
- Re-engagement numbers
These benchmarks help you spot what’s working and optimize over time.
3. Choose entry triggers
Your workflow begins when something happens. This is your trigger.
Common examples include:
- A customer signs up for your newsletter
- A first purchase is completed
- A product is browsed but not bought
- A customer becomes inactive
To improve segmentation, use tags and labels that group contacts by behavior or buying stage.
For example, By Malene Birger groups customers into tags like bargain hunters, high CLV, and at risk of churn. This makes it easier to tailor marketing messages and plan your engagement campaigns around real behaviors.
4. Build your workflow events
Now you’ll define what happens inside the workflow. This includes things like actions, delays, and decisions that shape the experience.
Now, break this into manageable building blocks:
Time delays
Use delays to space out your automated messages.
This prevents message overload and creates a smoother customer journey.
Example: Wait 3 days after sign-up before sending a promo email. Or delay a reminder until 24 hours after a cart is abandoned.
Pro tip: Base your delays on real customer behavior and buying habits, not guesswork.
Activities
These are the core actions in your workflow. Most marketing automation platforms support activities like:
- Sending an email or SMS marketing message
- Assigning or removing tags
- Sending a push notification via your mobile app
- Adding customers to social media retargeting ads
Use multiple channels to stay top of mind, and let your automation tool choose the best delivery method based on user preferences.
Conditional splits
This is where things get personal.
Conditional splits let you change the workflow path based on real-time data.
Examples:
- Opened email? Send a follow-up offer.
- Didn’t open? Try a different subject line.
- First-time buyer? Offer a next-purchase discount.
- Repeat shopper? Recommend items based on their purchase history.
Randomized splits
These let you test different versions of your messaging.
Use them for A/B tests or just to keep things fresh.
Example:
Instead of showing the same product recs to every user, use a randomized split to showcase different categories and see what drives more clicks.
Pro tip: Use this approach when you’re refining email marketing campaigns, experimenting with content marketing, or testing offers across target customers.
Workflow triggers
Inside your flow, you can set internal triggers to move people from one stage to another.
These could include:
- A completed purchase
- A clicked link
- A lack of activity after a certain timeframe
These transitions help you send the right message at the right time, without missing a beat.
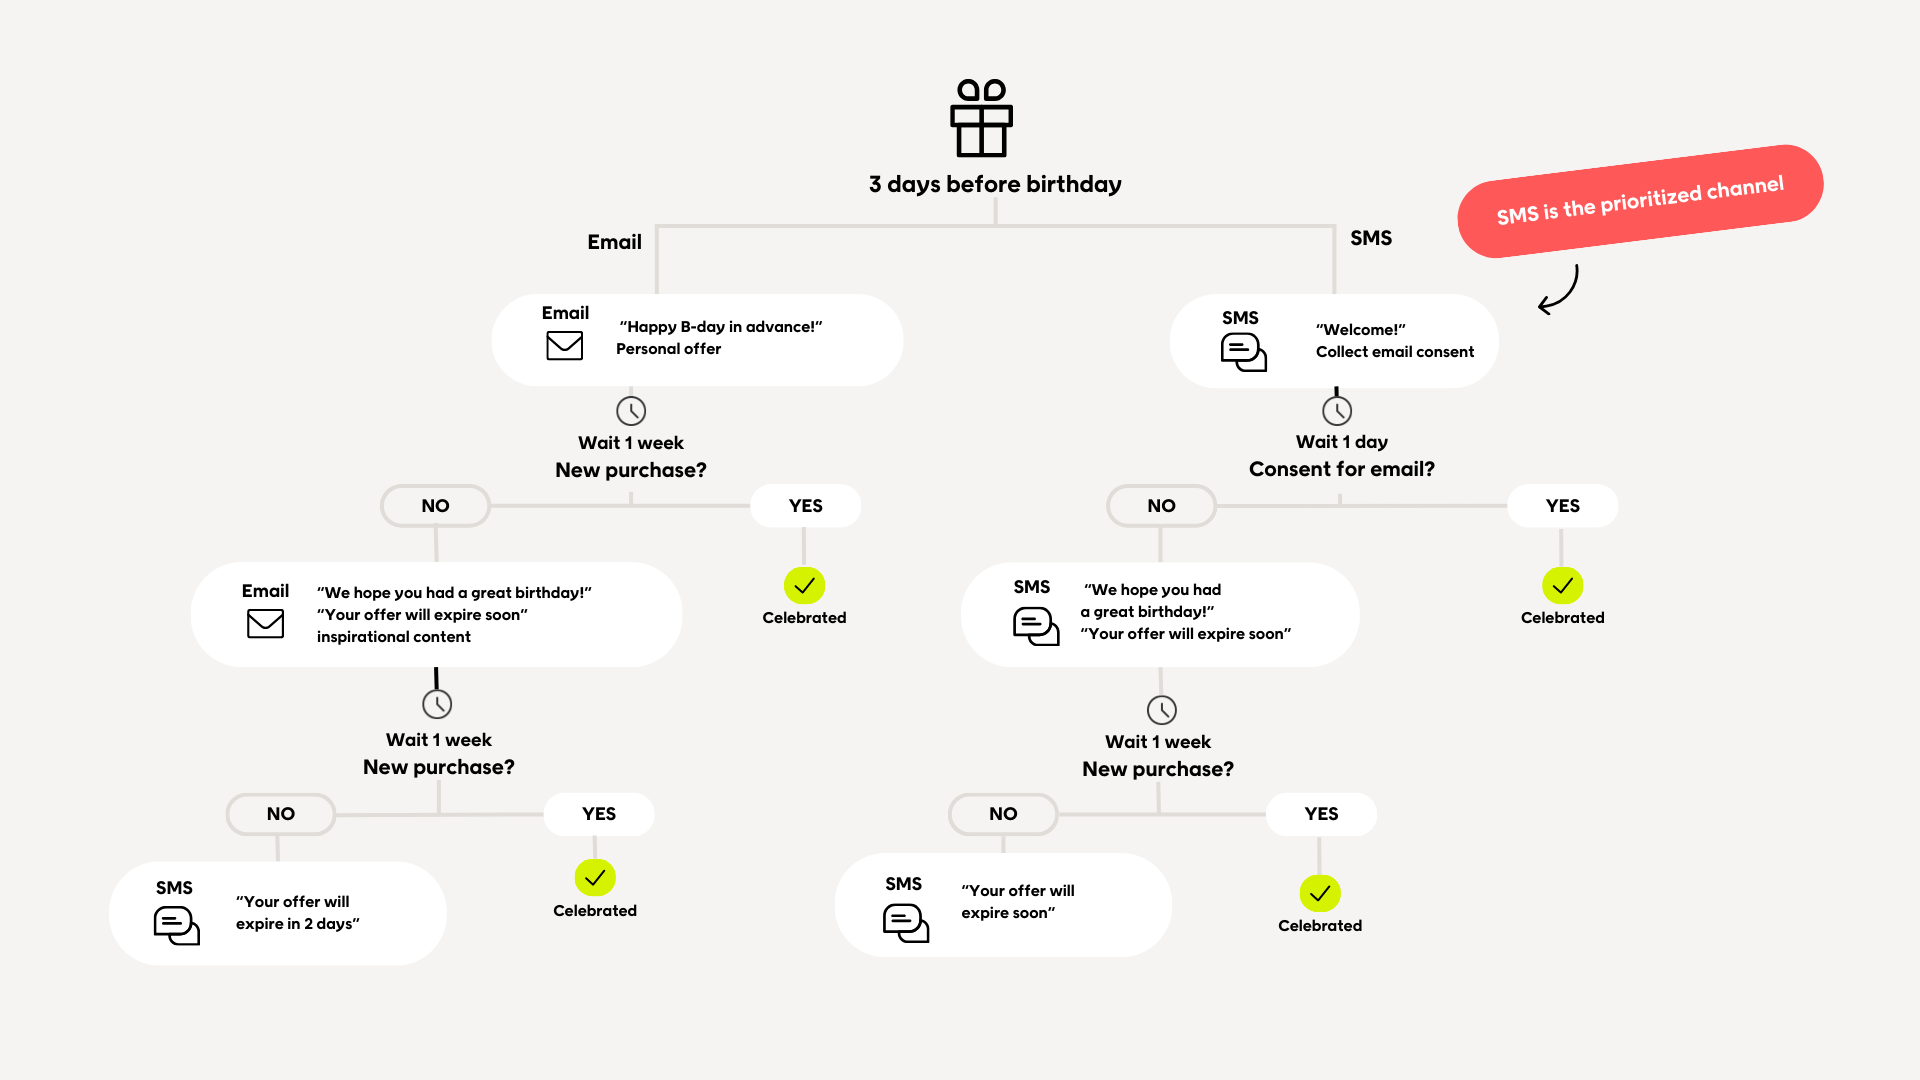
Example: Birthday workflow

- Goal: Celebrate your customer, boost loyalty, and sales
- Trigger: Date of birth
- Events:
- Delay: 3 days before birthday
- Activity: Send a personal offer via email or SMS
- Conditional split: If no action, follow up with a reminder
Add strong, relevant content
Even the best workflow fails without good content.
Your marketing automation software can handle delivery, but it’s your job to keep the message clear, valuable, and on brand.
Tips for writing great automated messages:
- Keep tone and voice consistent
- Offer real value, not just promos
- Use personalized content with names, tags, or dynamic product recommendations
- End with a clear call to action
Pro tip: Always test.
Try different subject lines, layouts, offers, or channels.
For example:
- Email vs. SMS
- Bold imagery vs. minimalist design
- 10% off vs. $10 off
“By testing and changing, open rates have gone up hugely, the engagement has become much higher, and the sales numbers have increased.”
– Laufey Lúðvíksdóttir, CRM and Loyalty Specialist, By Malene Birger
6. Follow up and optimize
Marketing workflow automation isn’t a one-and-done deal.
Once your automated workflows are live, keep a close eye on performance:
- Which steps lose people?
- Which emails convert best?
- Are your goals being met?
Use built-in analytics tools or connect your project management system to track results and assign tweaks to your team members.
“Learn from what works and what doesn’t when it comes to copy, content, and offers – then take what’s best and make it part of the automated communication.”
– Panduro
Let’s bring it all together
From welcome emails and re-engagement campaigns to birthday offers and cart reminders, the right marketing automation workflow does more than send messages.
It helps your marketing team work with purpose, not pressure.
With thoughtful planning and the right tools, you can:
- Replace manual tasks with smart automation
- Personalize every step of the customer journey
- Drive long-term customer loyalty and measurable growth
- Free up time for your team to focus on what really matters
Voyado makes it easy to manage marketing workflows, campaigns, and channels all in one place.
No complexity. No guesswork. Just results.
Curious how it works?
Take a tour of Voyado Engage and see how it can transform your retail marketing on your terms.
FAQs
What is a marketing automation workflow, and why is it important in retail?
A marketing automation workflow is a series of automated steps triggered by customer behavior, like signing up for a newsletter or abandoning a cart.
In retail, these workflows help guide potential customers through the customer journey, from discovery to repeat purchases.
By automating marketing tasks like emails, SMS, or social media posting, you reduce manual tasks, improve campaign performance, and build stronger customer experiences across multiple channels.
What’s the difference between workflow automation and marketing automation?
Workflow automation refers to streamlining repetitive actions across teams or tools.
Marketing automation focuses specifically on automating marketing efforts, such as email marketing workflows, engagement campaigns, and social media workflows.
The best marketing automation platforms support both.
They help your marketing team manage marketing processes, assign tasks, and personalize marketing messages throughout the customer lifecycle.
What tools can help me manage automated marketing workflows?
You need a tool that supports workflow automation, personalization, segmentation, and campaign tracking.
Voyado’s campaign management platform is designed for retail.
It helps you build custom workflows, send automated messages, track key performance indicators, and manage marketing campaigns without deep technical expertise.
How can I improve marketing workflow automation across my team?
Start by identifying your most repetitive marketing tasks. Then use an automation tool to streamline or remove them.
Build workflows around specific goals like lead generation, customer retention, or re-engagement campaigns.
You can also connect your project management system to keep your team members aligned. This makes it easier to manage marketing projects, assign tasks, and track progress as a team.
What types of content work best in an automated workflow?
Strong automated workflows rely on relevant content that speaks directly to your target customers.
Use dynamic content to create personalized messages based on customer data, purchase history, or browsing behavior.
Examples include:
- Targeted email marketing campaigns with special offers
- Automated push notifications for flash sales
- Focused landing pages tied to campaign flows
- Educational content marketing that helps nurture leads
Use analytics tools to test performance and improve your marketing strategy over time.


